Entity Framework Core Database First – Step by Step Guide for ASP.NET Core
Entity Framework Core provides a flexible and efficient way to work with relational databases. It is designed to support multiple databases SQL Server, MySQL, SQLite, PostgreSQL, NoSQL databases, etc. It can also support the asynchronous database operations to the performance of the application.
One of the key benefits of Entity Framework Core is that it allows developers to focus on the application logic instead of low-level database details. It provides a simple and intuitive API for querying and updating data.
Entity Framework Core provides two different approaches for creating and managing database schemas:
Database First: With this approach, developers start with an existing database schema and generate the corresponding data models in C#.
Code First: With this approach, developers define their data models using C# classes, and Entity Framework Core generates the database schema based on these classes.
In this article, we will be discussing on the database first approach in Entity Framework Core.
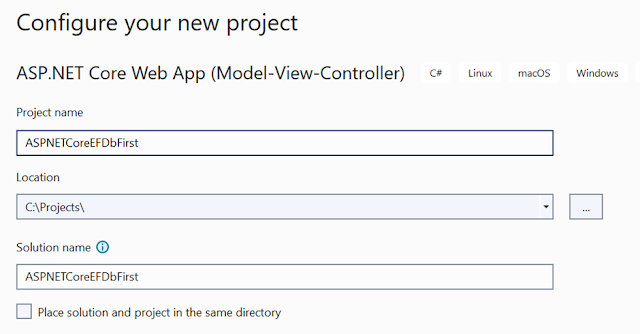
Step 1: Create ASP.NET Core Web App (MVC)
Before we start into the details of Entity Framework Core with the database first approach, we need to set up our ASP.NET Core project. To get started, open the Visual Studio, and create a new ASP.NET Core Web App MVC project.Step 2: Create Entities from Database (Db First Approach)
Once you have created the project, you need to install the necessary NuGet packages for Entity Framework Core. You can do this by right clicking on the project, choose “Manage NuGet Packages…”And, browse for package called “Microsoft.EntityFrameworkCore.SqlServer” and install the latest version of the package.
The above package installs the Entity Framework Core SQL Server provider, which allows us to work with SQL Server databases using Entity Framework Core.
Also, we need another package called “Microsoft.EntityFrameworkCore.Tools” to create the DB models from database.
The above package installs the Entity Framework Core Tools package for us to generate the C# model classes for database tables, creating the DbContext class and other common database tasks.
Now crease your database tables first in SQL Server (Db First Approach). For demonstration purpose, let’s create the three tables in SQL Server and they are as follows:
Now that we have setup the database tables, we can use Entity Framework Core's scaffolding tool to generate C# classes that correspond to our database tables. To do this, we'll use the Scaffold-DbContext command in the Package Manager Console:
Scaffold-DbContext "Data Source=ServerName;Initial Catalog=DatabaseName;User ID=DatabaseUserId;Password=DatabaseUserPassword;encrypt=false" Microsoft.EntityFrameworkCore.SqlServer -OutputDir DbModels
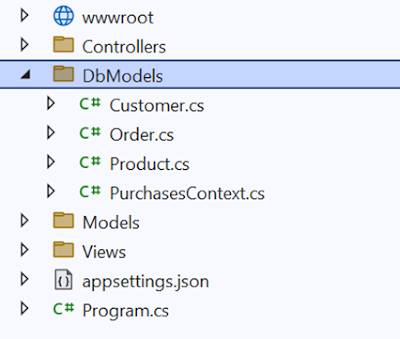
This command generates C# entity classes for all the tables in our database and places them in the DbModels directory of our project.
For example, we a "Customers" table in our database, the EF Core will generate a "Customer" entity class with properties that correspond to the columns in the "Customers" table. You can then use these entity classes to interact with the database using LINQ queries and other EF Core features.
The generator creates the PurchasesContext (DbContext) class and provides us with access to our entity sets (Customers, Products, and Orders) as shown below.
In addition to generating entity classes, the EF Core also generated " PurchasesContext" class. This class is responsible for managing the entities and their relationships, as well as communicating with the database.
The DbContext class will serve as our entry point for interacting with the database. When you look into PurchasesContext class, the relationships created between tables in SQL Server also maintained in the model classes.
The connection string which is supplied to Scaffold-DbContext is placed inside the PurchasesContext class under OnConfiguring method by the model class generator of Entity Framework Core. You must remove it, and configure in appsettings.json
Step 3: Configure and use EF Core in ASP.NET Core
Once we have generated the entity classes and the DbContext, we can use them to perform a variety of database operations, such as querying, inserting, updating, and deleting data. These operations are performed using LINQ queries.To use the Entity Framework Core in ASP.NET Core and perform database operations, you must register the PurchasesContext to ASP.NET Core service and tell SQL Server to use for database operations.
//Register DbContext to use SQL Server
builder.Services.AddDbContext<PurchasesContext>(options => {
    string connectionString = builder.Configuration.GetConnectionString("ProductsConStr");
    options.UseSqlServer(connectionString);
});
Once we register the PurchasesContext in ASP.NET Core, let’s create a Controller and View to test data retrieval from database using Entity Framework Core.
Go to HomeController if you have or create one in case if you don’t have.
Inject the PurchasesContext class to HomeController as dependency injection.
Here is the Controller code to access the database table data using Entity Framework Core.
    public class HomeController : Controller
    {
        private readonly PurchasesContext _db;

        public HomeController(PurchasesContext db)
        {
            _db = db;
        }

        public IActionResult Index()
        {
            //get first record of customer for testing
            Customer customer = _db.Customers.First();

            return View(customer);
        }
    }
Here is the View UI code to render the data on View which uses the database entity as a model.
@model ASPNETCoreEFDbFirst.DbModels.Customer

<p>
    Customer Id: @Model.Id
</p>

<p>
    Customer Name: @Model.Name
</p>

<p>
    Customer Email: @Model.Email
</p>

<p>
    Customer Phone: @Model.Phone
</p>
Once you run the application, this is how you should see:
The advantage of using EF Core database first approach is, since entity classes and DbContext is generated in C# classes from existing schema, you can quickly and easily interact with the database using an object-oriented EF Core API.
Hope this article help you to understand the EF Core DB first approach and working with it in ASP.NET Core. Thank for reading the article.


No comments: