Implementing JWT Authentication in ASP.NET Core Web APIs: A Comprehensive Guide
In the world of web development, securing your APIs is a critical concern. One popular approach to authentication in modern web applications is JSON Web Tokens (JWT). JWT provides a stateless and scalable solution for authenticating and authorizing users, making it an excellent choice for securing web APIs built with ASP.NET Core. In this blog post, we'll dive deep into implementing JWT authentication in ASP.NET Core Web APIs, covering all the necessary steps and providing detailed code examples along the way.
Understanding JWT:
Before we dive into the implementation details, let's briefly understand what JWT is and how it works. JWT is an open standard (RFC 7519) that defines a compact and self-contained way to securely transmit information between parties as a JSON object. A JWT token consists of three parts: a header, a payload, and a signature. The header contains metadata about the token, such as the algorithm used for signing. The payload contains claims, which are statements about an entity (typically the user) and additional data. The signature is used to verify that the token hasn't been tampered with.
Setting up the Project:
To get started, we'll create a new ASP.NET Core Web API project using Visual Studio or the .NET Core CLI. Once the project is set up, we'll install the necessary NuGet packages for JWT authentication:
First let configure the JWT details in appSettings.json as shown below:
In this example, we configure JWT authentication by adding the JwtBearerDefaults.AuthenticationScheme and setting up the token validation parameters. These parameters include the issuer, audience, lifetime validation, and the signing key used to verify the token's signature. We also enable the authentication and authorization middleware in the request pipeline.
Generating JWT Tokens:
To generate JWT tokens, we'll create a separate service responsible for handling the token generation process. Here's an example implementation:
Generate Token:
The GenerateToken method is typically not part of a controller. It's a separate service responsible for generating JWT tokens. In the previous example, the GenerateToken method is part of the JwtTokenService class.
To generate a token, you would create an endpoint (controller action) that calls the JwtTokenService and returns the generated token. Here's an example of how you might implement a controller action to generate a JWT token:
Securing API Endpoints:
With JWT authentication configured, we can now secure our API endpoints by applying the [Authorize] attribute to the controllers or individual actions.
Testing and Debugging:
During development and testing, it's helpful to have tools that can assist in generating and validating JWT tokens. One popular tool is the JWT.io debugger, which allows you to create, decode, and validate JWT tokens online.
Conclusion
Implementing JWT authentication in ASP.NET Core Web APIs involves several steps, including configuring JWT authentication services, generating JWT tokens, validating incoming requests, and securing API endpoints. By following the steps outlined in this blog post and utilizing the provided code examples, you'll be well-equipped to build secure and scalable web APIs that leverage the power of JWT authentication.
Understanding JWT:
Before we dive into the implementation details, let's briefly understand what JWT is and how it works. JWT is an open standard (RFC 7519) that defines a compact and self-contained way to securely transmit information between parties as a JSON object. A JWT token consists of three parts: a header, a payload, and a signature. The header contains metadata about the token, such as the algorithm used for signing. The payload contains claims, which are statements about an entity (typically the user) and additional data. The signature is used to verify that the token hasn't been tampered with.
Setting up the Project:
To get started, we'll create a new ASP.NET Core Web API project using Visual Studio or the .NET Core CLI. Once the project is set up, we'll install the necessary NuGet packages for JWT authentication:
> Install-Package Microsoft.AspNetCore.Authentication.JwtBearer
First let configure the JWT details in appSettings.json as shown below:
"Jwt": {
  "Issuer": "DotNET4Techies",
  "Audience": "DotNET",
  "Key": "DotNET 4 Techies - Website for Technology Enthusiasts"
}
In the Program.cs file, we'll configure JWT authentication by adding the required services and middleware.
builder.Services.AddAuthentication(JwtBearerDefaults.AuthenticationScheme)
        .AddJwtBearer(options =>
        {
            options.TokenValidationParameters = new TokenValidationParameters
            {
                ValidateIssuer = true,
                ValidateAudience = true,
                ValidateLifetime = true,
                ValidateIssuerSigningKey = true,
                ValidIssuer = builder.Configuration["Jwt:Issuer"],
                ValidAudience = builder.Configuration["Jwt:Audience"],
                IssuerSigningKey = new SymmetricSecurityKey(Encoding.UTF8.GetBytes(builder.Configuration["Jwt:Key"]))
            };
        });
Add the above code before builder.Build()
app.UseAuthentication();
app.UseAuthorization();
Add the above code before app.Run();
Generating JWT Tokens:
To generate JWT tokens, we'll create a separate service responsible for handling the token generation process. Here's an example implementation:
public class JwtTokenService
{
    private readonly IConfiguration _configuration;

    public JwtTokenService(IConfiguration configuration)
    {
        _configuration = configuration;
    }

    public string GenerateToken(IEnumerable<Claim> claims)
    {
        var key = new SymmetricSecurityKey(Encoding.UTF8.GetBytes(_configuration["Jwt:Key"]));
        var creds = new SigningCredentials(key, SecurityAlgorithms.HmacSha256);

        var token = new JwtSecurityToken(
            issuer: _configuration["Jwt:Issuer"],
            audience: _configuration["Jwt:Audience"],
            claims: claims,
            expires: DateTime.Now.AddMinutes(30),
            signingCredentials: creds
        );

        return new JwtSecurityTokenHandler().WriteToken(token);
    }
}
After that register the class in Program.cs file as a service.
builder.Services.AddSingleton<JwtTokenService>();In this example, the JwtTokenService class takes in the required configuration settings (issuer, audience, and signing key) from the IConfiguration instance. The GenerateToken method creates a new JwtSecurityToken object with the specified claims, expiration time, and signing credentials. Finally, it returns the generated token as a string.
Generate Token:
The GenerateToken method is typically not part of a controller. It's a separate service responsible for generating JWT tokens. In the previous example, the GenerateToken method is part of the JwtTokenService class.
To generate a token, you would create an endpoint (controller action) that calls the JwtTokenService and returns the generated token. Here's an example of how you might implement a controller action to generate a JWT token:
[Route("api/Auth")]
[ApiController]
public class AuthController : ControllerBase
{
    private readonly JwtTokenService _jwtTokenService;

    public AuthController(JwtTokenService jwtTokenService)
    {
        _jwtTokenService = jwtTokenService;
    }

    [HttpPost("token")]
    public IActionResult GenerateToken([FromBody] LoginRequest request)
    {
        // Authenticate user and generate claims
        var claims = new[]
        {
            new Claim(ClaimTypes.Name, "DotNET4Techies"), //change your code to use request object
            new Claim(ClaimTypes.Role, "User")
        };

        var token = _jwtTokenService.GenerateToken(claims);
        return Ok(new { Token = token });
    }
}
In this example, we're making a POST request to /api/auth/token with the username and password in the request body. If the request is successful, the server will return a JSON response containing the generated JWT token, which we can then store and use for subsequent authenticated requests.
Securing API Endpoints:
With JWT authentication configured, we can now secure our API endpoints by applying the [Authorize] attribute to the controllers or individual actions.
[Authorize]
[ApiController]
[Route("api/Product")]
public class ProductController : ControllerBase
{
    private static List<Product> _products = new List<Product>
    {
        new Product { Id = 1, Name = "Product 1", Price = 100 },
        new Product { Id = 2, Name = "Product 2", Price = 200 },
        new Product { Id = 3, Name = "Product 3", Price = 300 }
    };

    [HttpGet]
    public IEnumerable<Product> Get()
    {
        return _products;
    }

    [HttpGet("{id}")]
    public ActionResult<Product> Get(int id)
    {
        var product = _products.FirstOrDefault(p => p.Id == id);
        if (product == null)
        {
            return NotFound();
        }

        return product;
    }

    [HttpPost]
    public IActionResult Post([FromBody] Product product)
    {
        _products.Add(product);
        return CreatedAtAction(nameof(Get), new { id = product.Id }, product);
    }

    [HttpPut("{id}")]
    public IActionResult Put(int id, [FromBody] Product product)
    {
        var existingProduct = _products.FirstOrDefault(p => p.Id == id);
        if (existingProduct == null)
        {
            return NotFound();
        }

        existingProduct.Name = product.Name;
        existingProduct.Price = product.Price;

        return NoContent();
    }

    [HttpDelete("{id}")]
    public IActionResult Delete(int id)
    {
        var product = _products.FirstOrDefault(p => p.Id == id);
        if (product == null)
        {
            return NotFound();
        }

        _products.Remove(product);
        return NoContent();
    }
}
In this example, the [Authorize] attribute is applied at the controller level, ensuring that all actions within the ProductsController require authentication. Alternatively, you can apply the [Authorize] attribute to specific actions if you want to secure only certain endpoints.
Testing and Debugging:
During development and testing, it's helpful to have tools that can assist in generating and validating JWT tokens. One popular tool is the JWT.io debugger, which allows you to create, decode, and validate JWT tokens online.
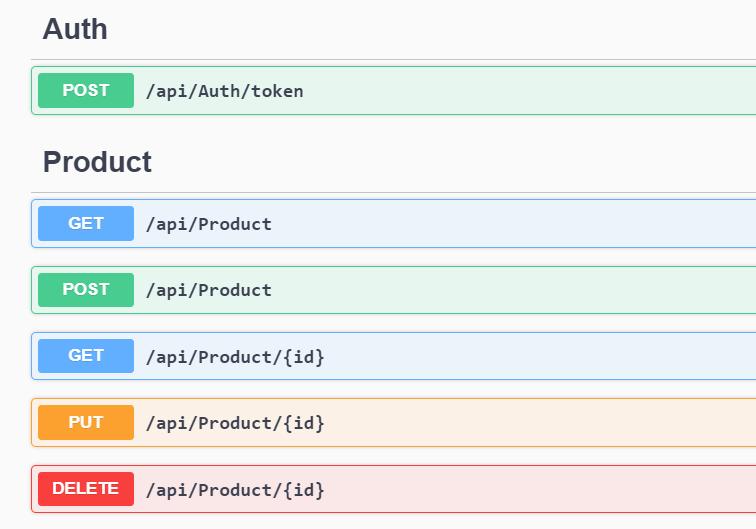
In this article we will use the Swagger and Postman tools to test the APIs.
When you call the Token API, you will see the token get generated as below:
When you call the Token API, you will see the token get generated as below:
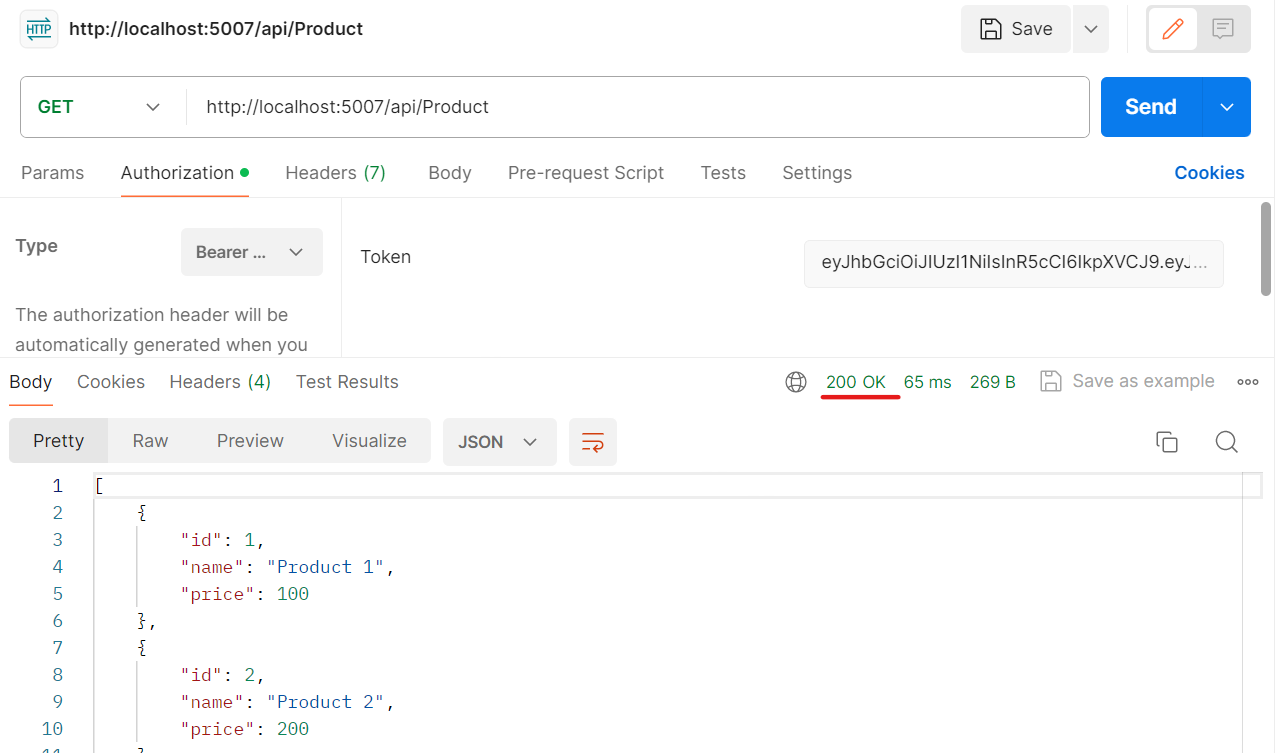
If you pass the token to API call, you will see 200 OK status as shown below:
Conclusion
Implementing JWT authentication in ASP.NET Core Web APIs involves several steps, including configuring JWT authentication services, generating JWT tokens, validating incoming requests, and securing API endpoints. By following the steps outlined in this blog post and utilizing the provided code examples, you'll be well-equipped to build secure and scalable web APIs that leverage the power of JWT authentication.


No comments: